App42 DevOps
To automate and fasten DevOps process (development, build,test and deploy), we are providing integration and automatic wiring of various DevOps tools mentioned below:
- Chef (systems and Cloud Infrastructure framework or Configuration Management tool) that automates the management of the infrastructure through recipes and cookbooks.
- Puppet is a Configuration Management tool that allows you to define the state of your IT infrastructure and then automatically enforces the desired state.
- Jenkins that provides Continuous Integration services for software development.
- Artifactory(Jfrog) is a Binary Repository Management tool. It helps the DevOps teams to manage, host and control the flow of binary artifacts.
- JMeter that can be used as a load testing tool for analyzing and measuring the performance of services.
- Selenium which is a functional testing tool for web applications.
Prerequisite
Key Pair Generation
As part of DevOps solution, we are providing a public/private key authentication to provide secure shell connections.
Steps to create Key-Pair on App42 DevOps:
- 1.Login to http://devopshq.shephertz.com.
- 2.Go to Key Section on left menu.
- 3.Click on Create Key Pair.
- 4.Enter Key Name and click on Submit button.
 Key-Pair Creation
 - 5. It will prompt the user to save private key.
 Save Private Key
Setup DevOps Environment
To setup a complete DevOps environment on App42 DevOps, follow the below steps:
- 1. Login to http://devopshq.shephertz.com.
- 2. Click on DevOps on left menu.
- 3. On Create Environment page, enter the name of Setup.
- Choose the key pair with which setup has to be created.
- Select the tools with the required configuration:
- i.Continuous Integration : Jenkins.
Add Master / Slaves (addition of slaves is optional) - ii.Configuration Management : Chef or Puppet.
- iii.Binary Repository : Artifactory(Jfrog).
- iv.Functional Testing : Selenium.
- v.Load Testing : JMeter.
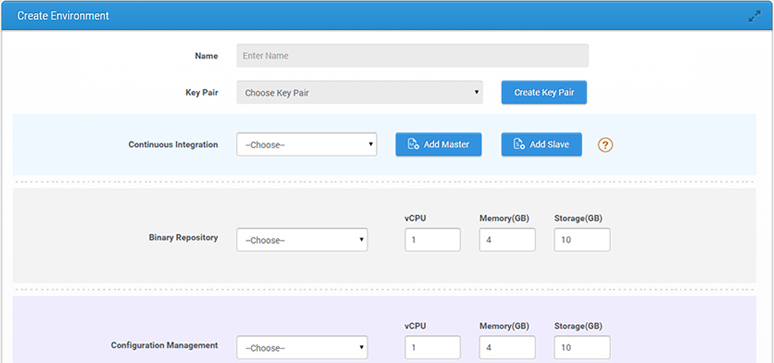 Create DevOps Environment-Select tools and configuration
 - i.Continuous Integration : Jenkins.
- 4.Click on Submit button.
- 5.Once Environment gets created, user will have an option to create Application Nodes for the setup.
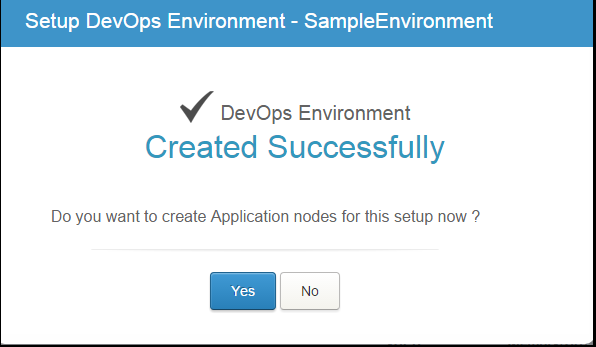 Option to Create Application Nodes
 - 6.If user Select “Yes”, then he will be redirected to the Create Application Node page.
- Once Application nodes gets created,
- i. Manage the DevOps setup from Manage Environment page
Note : In case of Puppet as Configuration Management tool, the Application nodes will get signed automatically with the Puppet Master present in user’s DevOps Setup. - Once Application nodes gets created,
- 7.If User Select “NO”, then he will be redirected to the Manage Environment page.
- 8.User can create and attach Application Nodes separately from DevOps -> Application Nodes section.
Setting up Application Nodes
User can create Application Nodes from DevOps -> Application Nodes section.
- 1.Choose Setup and Click on Create Application Node.
 Create Application Node
 - 2.Enter the required fields:
- DevOps Environment: From here, choose Environment with which nodes are required to be associated.
- Key Pair: Choose key (which you have created in above steps) from Key Pair drop down for your Application Nodes or create new key from “Create Key Pair”.
- Node: Enter the name of your node. To create more than 1 node, click on Add Node.
- Click on Submit.
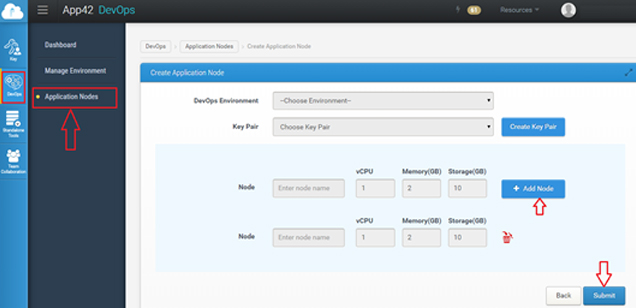 Configure Application NodeThis will create Application Nodes which will associate with the choosen setup.
- 3.Once Application nodes gets created,
- i. Manage the DevOps setup from Manage Environment page
- ii. Manage the Application Nodes from Application Nodes Section
Manage DevOps Environment
- 1. View DevOps environment on the DevOps > Manage Environment page.
 DevOps Setup
 - 2. Manage DevOps environment from Manage Environment page.
 Manage DevOps Setup
 - 3.Click on Manage to see the different tools configured for DevOps Environment.
- 4.Click on buttons (Start, Stop, Restart, Delete) to play with Setup.
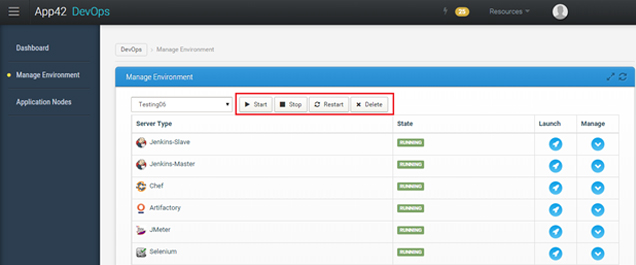 Operations on DevOps SetupNote : Start, Stop, Restart and Delete will be applied to entire setup.
- HARD - will be applied to VM as well as on application.
- SOFT – will be applied only on application.
There are 2 options for users to perform start, stop and restart on tools:
For eg. : If user chooses HARD STOP then the VM as well as the Application, both will stop and they will go into HARD STOP state. Now to start, user need to HARD START them. Similarly, if a resource is in SOFT STOP state, then user can start it with SOFT START .
- 5. Click on Launch to open the respective Management Console for the tool.
- 6. Click on Manage to perform various operations & update configuration for the tool.
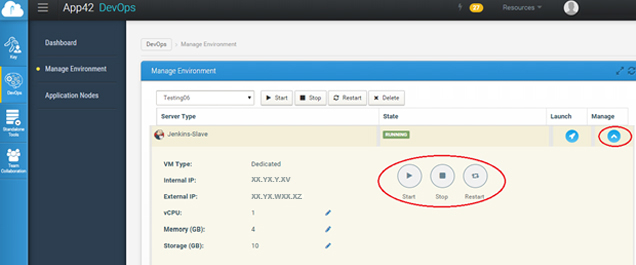 Operations On ToolNote : User can start,stop,delete and restart VApp. Also, user can update Resource with desired configuration.
 - 7. Click on Dashboard on left menu to view setup.
- 8. Click on View Health to view the health for virtual machine.
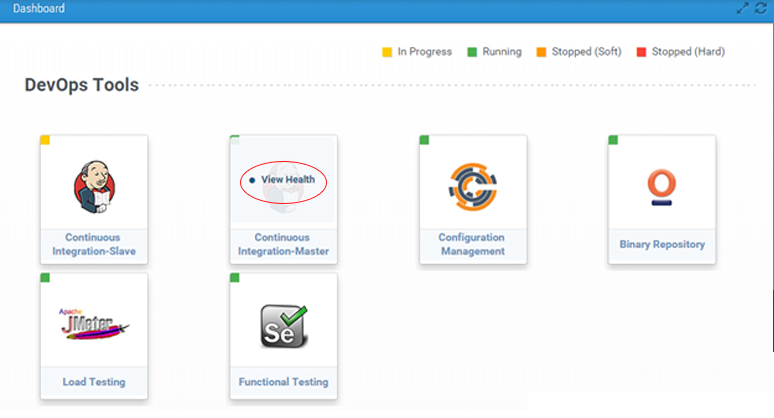 View Health of Resources
 - 9. View Health of resources in DevOps Environment
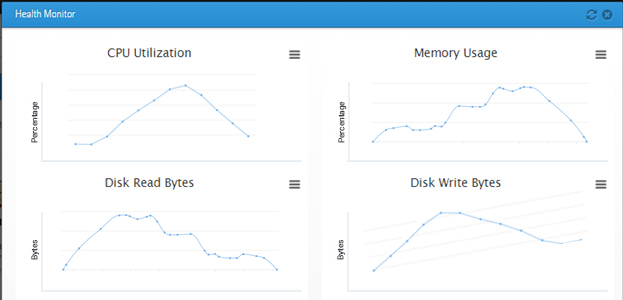 Resource Health Monitor
Manage Application Nodes
To Manage the Application nodes for DevOps Setup:
- 1.Go to DevOps -> Application Nodes.
- 2.Choose the setup.

- 3.Click on Launch to see the Server Details.
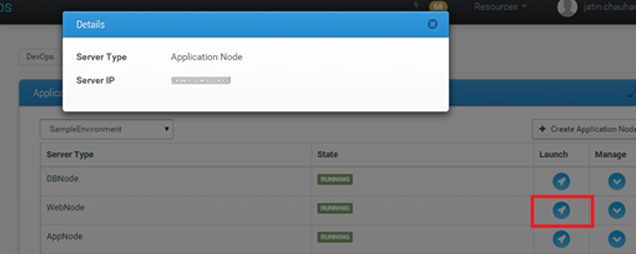 Launch
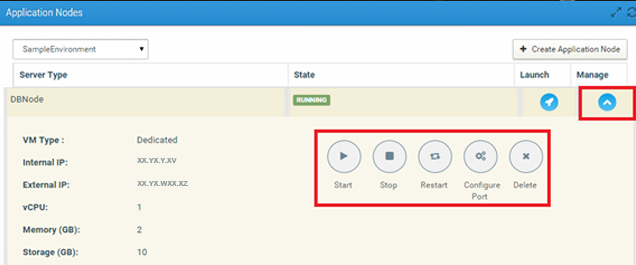
 - 4.Click on Manage to perform various operations (start, stop, restart, configure port, delete) on the node.
 Manage


