Create Test Job
- 1.Fork Sample Test Project on Git having both selenium unit test cases and Jmeter JMX file.
https://github.com/shephertz/DevOps_Sample_Test.git - 2.Get the Selenium server ip from DevOps Management console.
 Selenium server details
 - 3.Put the selenium server ip in the “JunitSeleniumTest.java” file present under /src/test/java/selenium , as shown in the below code:
new RemoteWebDriver(
new URL(“http://SeleniumServerIp/wd/hub/”), DesiredCapabilities.firefox()); - 4.Put the Application server Node url in the “SampleJmeterTest.jmx” file present under
/src/test/java/JMeter as shown below :
‹stringProp name=”HTTPSampler.domain”›http://ApplicationServerUrl‹/stringProp› - 5.Commit and Push the project into Git.
- 6.Create a Maven project i.e. Test_Job in Jenkins for testing purpose.
 Configure SSH Server
 - 7.Go to Jenkins -> Test_Job -> Configure.
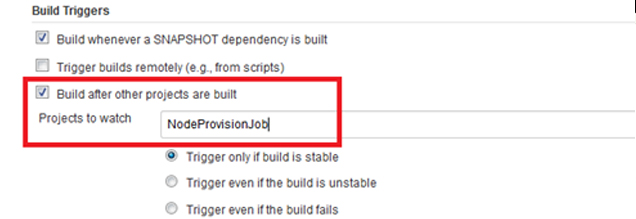
- Under Build Triggers , Select “Build after other projects are built” and enter “NodeProvisionJob” in Projects to watch .

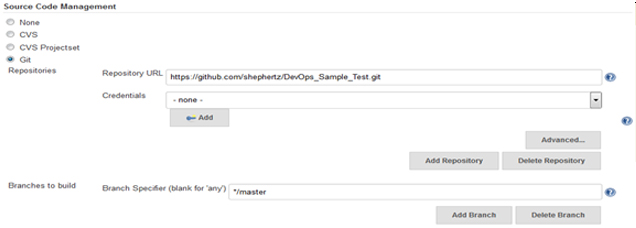
- Under Source Code Management , select Git and enter the Repository URL for Test project containing the Selenium unit test cases and JMeter jmx file.
- Select the Branch.
 Configure SCM
 - Under Build , provide the ROOT POM (pom.xml file name) present in the test project and provide Goals and options as “clean install”.
 Configure Build
 - Under Post Build step, in Execute Shell provide the below commands to send the JMeter jmx file to the JMeter server and bring the result back to the Jenkins server.
First step is to transfer your JMeter jmx file to the JMeter server.scp –i JMeterPrivateKey src/test/java/JMeter/SampleJmeterTest.jmx paasuser@‹JMeterServer›:where paasuser is the user for JMeter server, JMeterPrivateKey is the private key for JMeter that was configured in Jenkins Configuration and ‹JMeterServer› is your JMeter server.
Provide the command to run the jmx file on JMeter server.ssh -i JMeterPrivateKey paasuser@‹JMeterServer› /opt/jdk1.7.0_21/bin/java -jar /opt/apache-jmeter-2.9/bin/ApacheJMeter.jar -n -t SampleJmeterTest.jmx -l Report.xmlwhere Report.xml is generated output.
Bring back the generated report from JMeter server to the Jenkins server.scp –i JMeterPrivateKey paasuser@‹JMeterServer›: /home/paasuser/Report.xml . Configure commands in Execute shell
 - Once Report is with Jenkins server, user can publish the performance using the Post- build Actions using performance plugin.
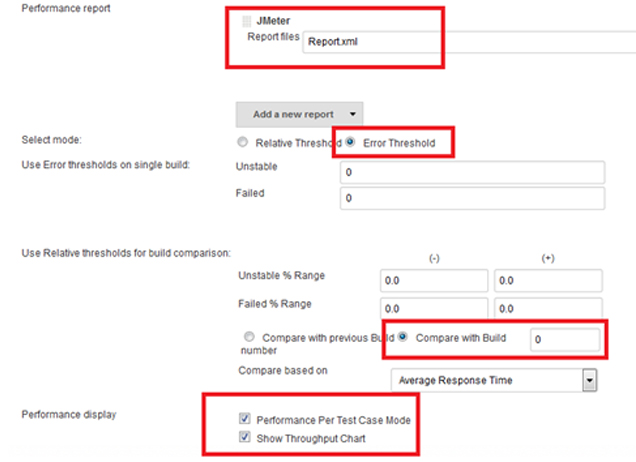
- Under Post Build actions – > Publish Performance test result report ,configure the following :
- i. Enter JMeter Report files as “ Report.xml “ which is your JMeter output file.
- ii. Select Mode as Error Threshold.
- iii. Enter Compare with build “ 0 “ .
- iv. Select Performance per test case mode .
- v.Select Show Throughput Chart.
 Configure Post build actions
 - Click on Apply and Save .
Put the AppNode IP in the “JunitSeleniumTest.java” file as given below:
driver.get(“http://AppNodeIP:8080/”);


