Node Bootstrapping
For using configuration management tools, node boot strapping is mandatory to install/execute certain packages on the client or agent nodes.Generally, the boot strap command is issued from the server. This is primarily done to register the nodes with the server.
Puppet
- 1.Install the Puppet agent package on client nodes (puppet).
- 2.Make sure client server can locate the Puppet master server, named puppet.
- 3.Once puppet agent package is installed and agent is able to locate puppet server on client nodes , user need to configure the authentication mechanism between the master and the agent nodes.Note : Puppet uses SSL certificates to authenticate communication between master and agent nodes. The Puppet master acts as a certificate authority (CA), and must generate its own certificates which is used to sign agent certificate requests which will setup the master’s certificates now.
- 4.On the client machine, issue the following command to request a certificate: puppetd –server devops.puppetexample.com –waitforcert 60 –test
Note : The puppet server needs to sign the generated certificate for the puppet client node. DevOps Service provide this facility to sign the node from DevOps setup or from Standalone Tools page only.
Steps to sign the agent nodes:- Login to devopshq.shephertz.com
- Go to puppet server either on Standalone Tool or DevOps where user has created puppet master.
- Click on Manage
- Click on sign node
- Enter node hostname and node IP.
- Click on Submit.
Chef
Chef Server stores recipes, cookbooks etc. as well as other configuration data. The Chef client is installed on each node.
The knife bootstrap command is a common way to install the chef-client on a node.
Steps to Generate knife.rb:
- 1.Navigate to the folder ~/chef-repo/.chef to create a knife configuration file.
- 2.Open a file named knife.rb in chosen text editor.
- 3.Update the following configuration into the knife.rb file:
~/chef-repo/.chef/knife.rb
S.no. Field name Values 1 log_level “info” 2 log_location “STDOUT” 3 node_name ‘user’ 4 client_key ~/chef-repo/.chef/user.pem 5 validation_client_name shortname-validator 6 validation_key ~/chef-repo/.chef/shortname.pem 7 chef_server_url https://123.245.267.89/organizations/shortname 8 syntax_check_cache_path ~/chef-repo/.chef/syntax_check_cache 9 cookbook_path ~/chef-repo/cookbooks Change the following:
- The value for node_name should be the user name.
- Change user.pem under client_key to reflect .pem file for the user.
- The validation_client_name should be the organization’s shortname followed by -validator.
- Shortname.pem in the validation_key path should be set to the shortname as defined in the steps above.
Finally, the chef_server_url needs to contain the IP address or URL of your Chef server, with the shortname in the file path changed to the shortname defined above.
- 4.Move to the chef-repo and copy the needed SSL certificates from the server:
- knife ssl fetch
- 5.Confirm that knife.rb is set up correctly by running the client list:
- knife client list
- 6.This command should output the validator name.
With both the server and a workstation configured, it is possible to bootstrap your first node.
Bootstrap a Node
Bootstrapping a node installs the chef-client and validates the node, allowing it to read from the Chef server and make any needed configuration changes picked up by the chef-client in the future.
- 1.From your workstation, bootstrap the node either by using the node’s root user, or a user with elevated privileges:
- knife bootstrap 123.145.167.189 -x root -P password –node-name nodename
- knife bootstrap 123.245.267.289 -x username -P password –sudo –node-name nodename
- 2.Confirm that the node has been bootstrapped by listing the nodes through:
- knife node list
- 3.The new node should be included on the list.
- On UNIX- and Linux- based machines: The knife bootstrap command is issued from a Server
- On Microsoft Windows machines: The knife bootstrap windows winrm command is issued from a Server.
- After this user need to complete the chef-client run to register the nodes with the chef server.
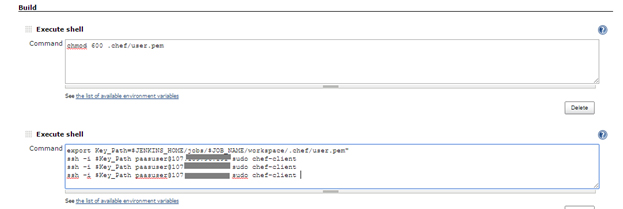
- Specify the chef-client run command in Jenkins configuration as given in the screenshot for users application nodes.
- Commands to run :
chmod 600 .chef/user.pem
export Key_Path = $JENKINS_HOME/jobs/$JOB_NAME/workspace/.chef/user.pem
ssh -i $Key_Path paasuser@92.246.abc.xya sudo chef-client
ssh -i $Key_Path paasuser@92.246.abc.xyb sudo chef-client
ssh -i $Key_Path paasuser@92.246.abc.xyc sudo chef-client


