App42 DevOps Guide
This guide explains how App42 DevOps solution with automatic wiring of the DevOps toolchain can be used for Continuous Delivery & Deployment purpose. The example taken in this guide is of a 3 tier application (application/database/webserver).The assumption taken in this guide is, Devops setup along with application nodes are in ShepHertz VDC. The Guide explain how a user can use the App42 DevOps setup and configure various jobs to build / deploy and test his application automatically , which will lead to automatic deployment by just a push of his code into source code management repository.
To Experience the complete App42 DevOps Solution, user needs to follow the below steps:
- 1.Fulfill the prerequisites that is to create a DevOps setup and application nodes.
- 2.Job configurations on Jenkins for build, deploy and test.
- 3.Job triggering which will run the jobs on jenkins and user can observe the different phases of devops
Build -> Unit Test -> Deploy-> Functional Test- > Load test - 4.Code change in the sample application project which will lead to automatic deployment.
Pre-requisites
- 1.Create a new setup from DevOps > Manage Environment. Click on Create Environment with following resources:
- Jenkins
- Chef /Puppet
- Artifactory
- Selenium
- JMeter
- 2.Once the setup has been completed, message will appear to create Application Nodes as follows:

Click Yes if you want to create Application Nodes. This will navigate you to Create Application Nodes pane.
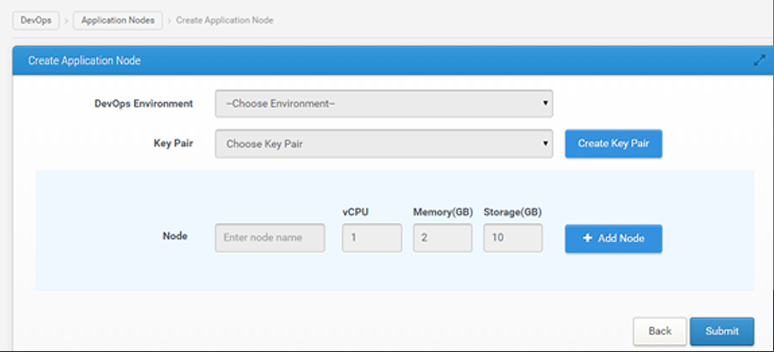 Create Application Nodes
- Choose Environment with which nodes are required to be associated.
- Choose key from Key Pair dropdown for the nodes or create a new key.
- Enter the name of node. Also, if you want to create more than 1 node, click on Add node.
- Click on Submit.
Application Nodes have been created successfully.
You can also create application nodes from DevOps > Application Nodes.
Configurations Required
- 1.
Upload Private Key of JMeter to Jenkins Server
Upload the private key of JMeter server in Jenkins using the Upload file from Jenkins from DevOps dashboard. Upload private key
 - 2.
Configure Chef Workstation
Download Chef Starter Kit
Get the Chef Server IP from DevOps Management console and launch chef from your browser and follow the below steps:- Sign up on Chef and fill all the mandatory fields.
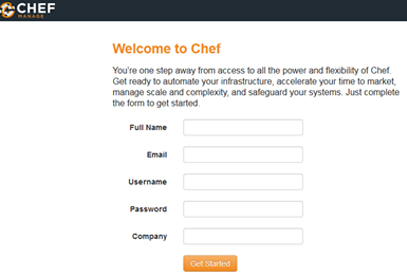 Sign up Chef
 - Click on “Create New Organization” to create an organization.
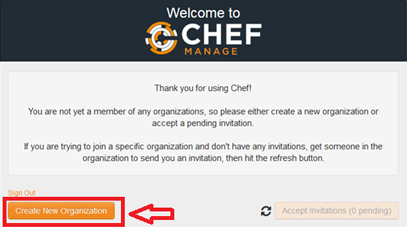 Create new organization
 - Provide Organization “Full Name” and “Short Name”.
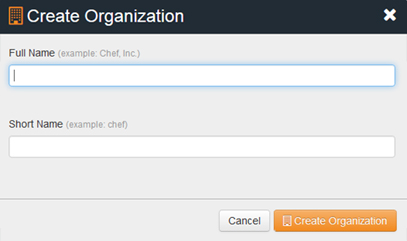 Fill Organization details
 - Click on “Create Organization”.
- Once the organization has been created, click on “Download Starter Kit”.
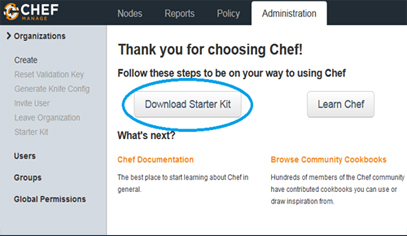 Download Starter Kit
- Sign up on Chef and fill all the mandatory fields.
Steps to use DevOps Solution:
- 1.done
- 2.done
- 3.done
- 4.Update Chef Databags and Upload cookbooks to Chef Server
- Go to the Console Output of the SampleJob run of previous step in Jenkins
 Jenkins – Master & Slave
 - Search for the text “Deploying Artifacts” and copy the war url from there
Deploying artifact: http://xy.zyx.xyx.xyz:8080/libs-snapshot-local/org/shephertz/Acme_Sample_App/0.0.1-SNAPSHOT/Acme_Sample_App-0.0.1-SNAPSHOT.war - Go to /chef-repo/data_bags/webConfig/ on chef workstation.
- Open tomcat.json and update the war URL with the war url you copied earlier from SampleJob console output :

- Go to /chef-repo/data_bags/dbConfig/.on chef workstation
- Open mysql.json and update the address with your database node Private IP address.

- Go to /chef-repo/roles and open webNode.json.
- Update the “localhost” in target with the app node Private IP.

- Upload the cookbooks to the chef server by running the below command from /chef-repo/ directory on your chef workstation.
knife upload .
- Go to the Console Output of the SampleJob run of previous step in Jenkins
- 5.Bootstrap the application nodes from chef workstation
- Upload the private keys of application nodes on the workstation under /chef-repo/.chef/ directory.
- Make sure the private keys you uploaded have sufficient permissions (600).
- Bootstrap the application nodes on workstation using the knife bootstrap command from /chef-repo/ directory.
knife bootstrap <where “username” is the username of the app node and “appnodeprivatekey.pem” is the private key for the application node.
> -x < > -i .chef/appnodeprivatekey.pem –sudo –run-list role["appServerNode"] knife bootstrap <where “username” is the username of the web node and “webnodeprivatekey.pem” is the private key for the web node.> -x < > -i .chef/webnodeprivatekey.pem –sudo –run-list role["webNode"] knife bootstrap <where “username” is the username of the db node and “dbnodeprivatekey.pem” is the private key for the db node.> -x < -i .chef/dbnodeprivatekey.pem –sudo –run-list ro le["dbNode"] “dbNode”, “appServerNode”, “webNode” roles are associated with nodes on a Chef server.
- 6.Configure Triggering of Chef Client Run Job from Sample Job
- Go to Jenkins -> SampleJob-> Configure.
- Under Post Build action -> Select “Build Other Projects”, build a project with name ChefClientRun Job.

- 7.Configure Application Nodes on Jenkins
- Go to Jenkins -> Manage Jenkins -> Configure System.
- Go to “Publish over SSH” section.
- Under SSH Servers provide details of the app node :
- 1.Provide App node Name.
- 2.Provide App node Hostname.
- 3.Provide App node Username
 Configure SSH Server with node details
 - 4.Check the checkbox “Use password authentication, or use a different key “.
- 5.Copy and paste the private key of the App node in the section named as Key.

- 6.Click on Add to add the SSH server details of DB Node as well as for web node.
- 8.Sample Chef Client Run Job creation.
- Create a Job ChefClientRun in Jenkins.
- Go to Build Environment Section.
- Select “Send files or execute commands over SSH after the build runs”.
- Under “SSH Publishers” – > SSH Server
- 1.Select App node name in Name Section.
- 2.Under Transfer -> Exec command, enter the command “sudo chef-client”.
 Configure SSH Server
- Click on Add Servers to add the sudo chef-client command for db node and web node as well.
- Under Post Build Action Select “Build Other Projects”, provide the Test_Job name.

- 9.Sample Test Job creation.
- Fork Sample Test Project on git having both selenium unit test cases and Jmeter JMX file
https://github.com/shephertz/DevOps_Sample_Test.git - Get the Selenium server ip from DevOps Management console.
- Put the selenium server ip in the JunitSeleniumTest.java file present under /src/test/java/selenium , as shown in the below code.
new RemoteWebDriver( new URL(“http://SeleniumServerIp/wd/hub/”), DesiredCapabilities.firefox()); - Put the Application server url in the SampleJmeterTest.jmx file present under
/src/test/java/JMeter as shown below
http://ApplicationServerUrl - Commit and Push the project into git.
- Create a Maven project i.e. Test_Job in Jenkins for testing purpose.
 Configure SSH Server
 - Go to Jenkins -> Test_Job -> Configure.
- Restrict job to run on Jenkins master

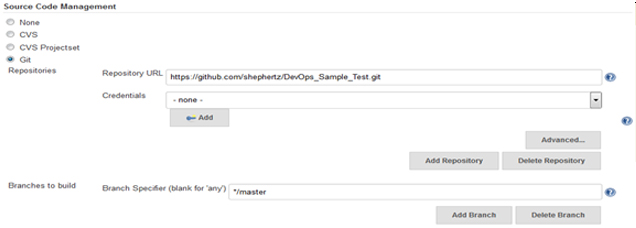
- a.Under Source Code Management, select Git and enter the Repository URL for Test project containing the Selenium unit test cases and JMeter jmx file.
- b.Select any Branch.
 Configure SCM
 - c.Under Build, provide the ROOT POM (pom.xml file name) present in the test project and provide Goals and options as “clean install”.
 Configure build
 - d.Under Post Build step, in Execute Shell provide the below commands to send the JMeter jmx file to the JMeter server and bring the result back to the Jenkins server.
First step is to transfer your JMeter jmx file to the JMeter server.scp –i /home/paasadmin/.ssh/id_rsa /home/paasadmin/.jenkins/jobs/Test_Job/workspace/src/test/java/JMeter/SampleJmeterTest.jmx paasadmin@where Report.xml is generated output.:/home/paasadmin
Bring back the generated report from JMeter server to the Jenkins server.scp –i home/paasadmin/.ssh/id_rsa paasadmin@:/home/paasadmin/Report.xml.  Configure commands in Execute shell/home/paasadmin/.ssh/id_rsa is the private key of the JMeter that you have uploaded in Jenkins.
 - e.Once Report is with Jenkins server, user can publish the performance using the Post- build Actions using performance plugin.
- f.Under Post Build actions – > Publish Performance test result report , configure the following :
- Enter JMeter Report files as “Report.xml “which is your JMeter output file.
i. Select Mode as Error Threshold.ii. Enter Compare with build ” 0 ” .iii. Select Performance per test case mode.iv. Select Show Throughput chart.
 Configure Post build actions
 - Enter JMeter Report files as “Report.xml “which is your JMeter output file.
- g.g.Click on Apply and Save.
- Fork Sample Test Project on git having both selenium unit test cases and Jmeter JMX file
- 10. Run the Jobs for complete Execution
- Go to Jenkins -> SampleJob
- Click on Build Now and check the console output for the below observations.
- a.Goals gets executed for the sample application.

- b.Unit Tests gets executed

- c.Build successful

- d.Deploying Artifacts to Artifactory

- e.Chef-client getting executed on Application nodes

- f.Triggering Test_Job on successful build

- a.Goals gets executed for the sample application.
- Go to Test_Job -> console output and see the below observation:
- a.Selenium Test Cases getting executed

- b.JMeter test cases getting executed

- c.User can see the Performance Report Graph on Jenkins Job Page.
 Performance Report Graph on Jenkins Job Page
 - d.User can also see the performance trend of the Generated xml report file.
 Performance Report trend
 - e.Selenium Unit Test case result can be viewed on the Jenkins Test_Job page as below:

- f.Finally user can launch his Application using the application/webserver URL
- a.Selenium Test Cases getting executed
Make changes to the Sample App and Push to git repository
- 1.Make changes to the sample application, commit and push to git repository.
- 2.Check after one minute that the SampleBuild job gets triggered automatically.
- 3.Once sample job runs successfully, Test_Job gets triggered automatically.
- 4.On successful completion of both SampleJob and Test_Job, launch the application using the application server URL and observe the changes.
- 5.The changes gets deployed with just a push of code.


